Microsoft Excel provides several controls for dialog sheets that are useful for selecting items from a list. Examples of controls are list boxes, combo boxes, spin buttons, and scroll bars.
For more information about form controls in Excel, see
Overview of forms, form controls, and ActiveX controls on a worksheet.
The following methods show how to use list boxes, combo boxes, spin buttons, and scroll bars. The examples use the same list, cell link, and Index function.
Enable the Developer tab
To use the form controls in Excel 2010, you have to enable the Developer tab. To do this, follow these steps:
- Click File, and then click Options.
- Click Customize Ribbon in the left pane.
- Select the Developer check box under Main Tabs on the right, and then click OK.
To use the forms controls in Excel 2007, you must enable the
Developer tab. To do this, follow these steps:
- Click the Microsoft Office Button, and then click Excel Options.
- Click Popular, select the Show Developer tab in the Ribbon check box, and then click OK.
Set up the list, the cell link, and the index
- In a new worksheet, type the following items in the range H1:H20:
      H1 : Roller Skates
      H2 : VCR
      H3 : Desk
      H4 : Mug
      H5 : Car
      H6 : Washing Machine
      H7 : Rocket Launcher
      H8 : Bike
      H9 : Phone
      H10: Candle
      H11: Candy
      H12: Speakers
      H13: Dress
      H14: Blanket
      H15: Dryer
      H16: Guitar
      H17: Dryer
      H18: Tool Set
      H19: VCR
      H20: Hard Disk
- In cell A1, type the following formula:
=INDEX(H1:H20,G1,0)
List box example
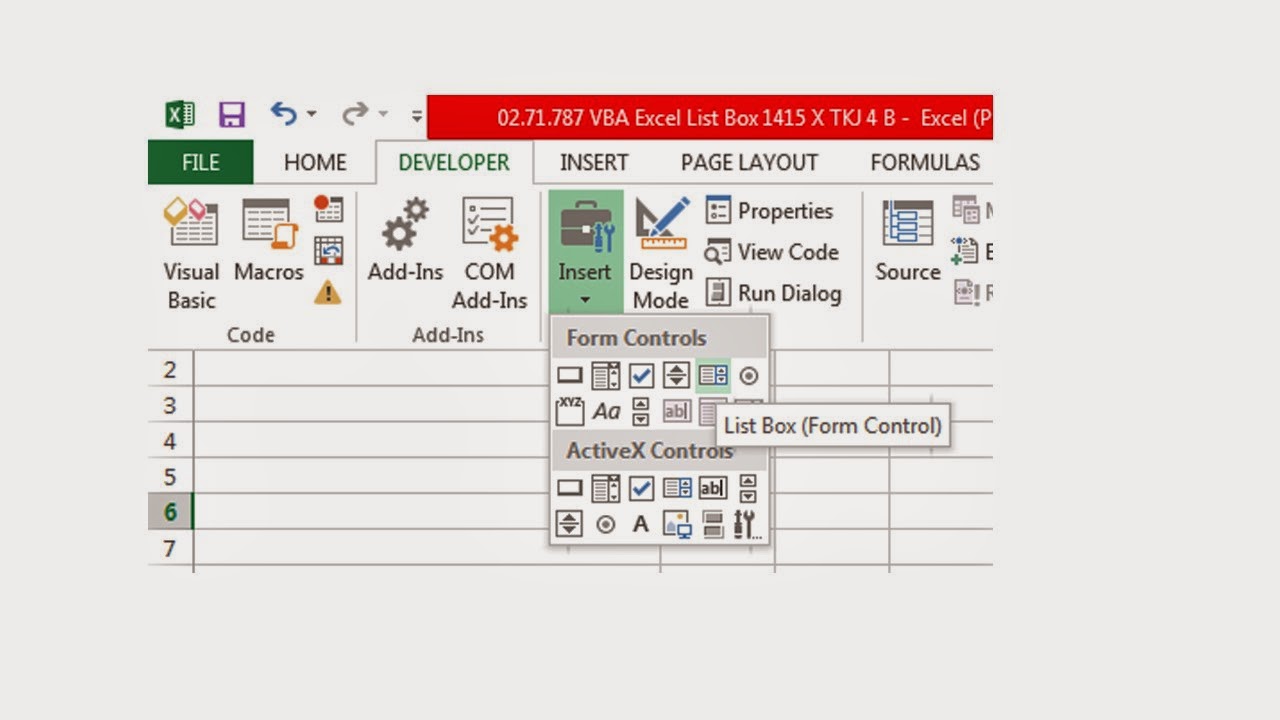
- To add a list box in Excel 2010 and Excel 2007, click the Developer tab, click Insert in the Controls group, and then click List Box Form (Control) under Form Controls.
To add a list box in Excel 2003 and in earlier versions of Excel, click the List Box button on the Forms toolbar. If the Forms toolbar is not visible, point to Toolbars on the View menu, and then click Forms. - Click the worksheet location where you want the upper-left corner of the list box to appear, and then drag the list box to where you want the lower-right corner of the list box to be. In this example, create a list box that covers cells B2:E10.
- In the Controls group, click Properties.
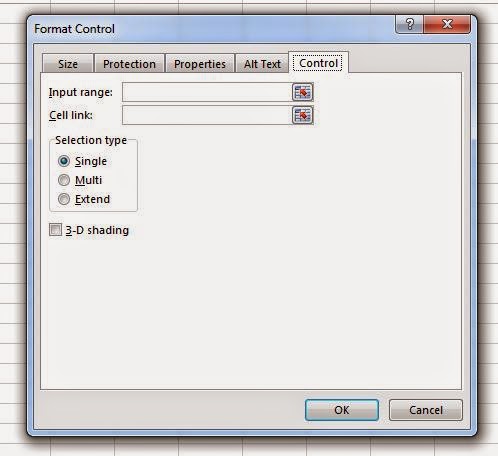
- In the Format Object window, type the following information, and then click OK.
- To specify the range for the list, type H1:H20 in the Input range box.
- To put a number value in cell G1 (depending on which item is selected in the list), type G1 in the Cell link box.
Note The INDEX() formula uses the value in G1 to return the correct list item. - Under Selection type, make sure that the Single option is selected.
Note The Multi and Extend options are only useful when you are using a Microsoft Visual Basic for Applications procedure to return the values of the list. Note also that the 3-D shading check box adds a three-dimensional look to the list box.
- The list box should display the list of items. To use the list box, click any cell so that the list box is not selected. If you click an item in the list, cell G1 is updated to a number that indicates the position of the item that is selected in the list. The INDEX formula in cell A1 uses this number to display the item's name.
Combo box example
- To add a combo box in Excel 2010 and Excel 2007, click the Developer tab, click Insert, and then click Combo Box under Form Controls.
To add a combo box in Excel 2003 and in earlier versions of Excel, click the Combo Box button on the Forms toolbar. - Click the worksheet location where you want the upper-left corner of the combo box to appear, and then drag the combo box to where you want the lower-right corner of the list box to be. In this example, create a combo box that covers cells B2:E2.
- Right-click the combo box, and then click Format Control.
- Type the following information, and then click OK:
- To specify the range for the list, type H1:H20 in the Input range box.
- To put a number value in cell G1 (depending on which item is selected in the list), type G1 in the Cell link box.
Note The INDEX formula uses the value in G1 to return the correct list item. - In the Drop down lines box, type 10. This entry determines how many items will be displayed before you have to use a scroll bar to view the other items.
Note The 3-D shading check box is optional. It adds a three-dimensional look to the drop-down or combo box.
- The drop-down box or combo box should display the list of items. To use the drop-down box or combo box, click any cell so that the object is not selected. When you click an item in the drop-down box or combo box, cell G1 is updated to a number that indicates the position in the list of the item selected. The INDEX formula in cell A1 uses this number to display the item's name.
Spin button example
- To add a spin button in Excel 2010 and 2007, click the Developer tab, click Insert, and then click Spin Button under Form Controls.
To add a spinner in Excel 2003 and in earlier versions of Excel, click the Spinner button on the Forms toolbar. - Click the worksheet location where you want the upper-left corner of the spin button to appear, and then drag the spin button to where you want the lower-right corner of the spin button to be. In this example, create a spin button that covers cells B2: B3.
- Right-click the spin button, and then click Format Control.
- Type the following information, and then click OK:
- In the Current value box, type 1.
This value initializes the spin button so that the INDEX formula will point to the first item in the list. - In the Minimum value box, type 1.
This value restricts the top of the spin button to the first item in the list. - In the Maximum value box, type 20.
This number specifies the maximum number of entries in the list. - In the Incremental change box, type 1.
This value controls how much the spin button control increments the current value. - To put a number value in cell G1 (depending on which item is selected in the list), type G1 in the Cell link box.
- Click any cell so that the spin button is not selected. When you click the up control or down control on the spin button, cell G1 is updated to a number that indicates the current value of the spin button plus or minus the incremental change of the spin button. This number then updates the INDEX formula in cell A1 to show the next or previous item.
The spin button value will not change if the current value is 1 and you click the down control, or if the current value is 20 and you click the up control.
Scroll bar example
- To add a scroll bar in Excel 2010 and Excel 2007, click the Developer tab, click Insert, and then click Scroll Bar under Form Controls.
To add a scroll bar in Excel 2003 and in earlier versions of Excel, click the Scroll Bar button on the Forms toolbar. - Click the worksheet location where you want the upper-left corner of the scroll bar to appear, and then drag the scroll bar to where you want the lower-right corner of the scroll bar to be. In this example, create a scroll bar that covers cells B2:B6 in height and is about one-fourth of the width of the column.
- Right-click the scroll bar, and then click Format Control.
- Type the following information, and then click OK:
- In the Current value box, type 1.
This value initializes the scroll bar so that the INDEX formula will point to the first item in the list. - In the Minimum value box, type 1.
This value restricts the top of the scroll bar to the first item in the list. - In the Maximum value box, type 20. This number specifies the maximum number of entries in the list.
- In the Incremental change box, type 1.
This value controls how many numbers the scroll bar control increments the current value. - In the Page change box, type 5. This value controls how much the current value will be incremented if you click inside the scroll bar on either side of the scroll box).
- To put a number value in cell G1 (depending on which item is selected in the list), type G1 in the Cell link box.
Note The 3-D shading check box is optional. It adds a three-dimensional look to the scroll bar.
- Click any cell so that the scroll bar is not selected. When you click the up or down control on the scroll bar, cell G1 is updated to a number that indicates the current value of the scroll bar plus or minus the incremental change of the scroll bar. This number is used in the INDEX formula in cell A1 to show the item next to or before the current item. You can also drag the scroll box to change the value or click in the scroll bar on either side of the scroll box to increment it by 5 (the Page change value). The scroll bar will not change if the current value is 1 and you click the down control, or if the current value is 20 and you click the up control.